Monday, March 21, 2016

Crawfish Monica

Ahh spring. For Louisiana folks this translates to the perfect time for backyard crawfish boils.


I won't be long-winded about the boils, but I want to let you in on one of the best applications for those delicious leftover crawfish tails. If your friends and family are as kind as mine are, they'll hang out and help you peel the leftovers.


When life gives you crawfish, you make Crawfish Monica. The recipe has its roots in New Orleans Jazz and Heritage Fest, where it is the "official" food of the festers.


Crawfish Monica

Ingredients

  • 6 tbsp unsalted butter
  • 2 tbps olive oil
  • 1 medium onion, diced
  • 3 garlic cloves, minced
  • 1/2 cup dry white wine
  • 1 tbsp cajun spice (Slap Ya Mama is what I use, but substitute whatever you have around)
  • 2 cups heavy cream
  • juice of one medium lemon
  • 1/2 cup parsley, minced
  • 1/2 cup green onion, chopped
  • 1 lb peeled cooked crawfish tails
  • 1.5 cups grated parmesan cheese
  • 1 pound cooked strained pasta (preferably rotini)

Method

In salted water, cook pasta and keep warm while set aside. In a large saute pan on medium heat, melt butter and olive oil. Add onion and garlic, and lightly salt and pepper. Saute until nearly translucent, then add white wine and cajun spice of your choice. Cook until nearly completely evaporated; approximately 5 minutes. Add cream and lemon juice, and stir to combine. Cook for 3 more minutes, or until the liquid has reduced by about 1/3. Add parsley, green onion, and crawfish. Stir and cook for 5 minutes or until crawfish are warmed through. Lower temp to low, then add 1 cup parmesan cheese. Stir until melted. Taste for flavor. If not enough, add more cajun spice or lemon juice. Combine sauce and pasta over low heat, and combine. Add additional 1/2 cup cheese and stir to melt. 

Voila! Crawfish Monica. Best paired with Traditional Jazz and Abita Strawberry beer. 

Saturday, March 5, 2016

DIY Bistro-lighting Tips and Tricks

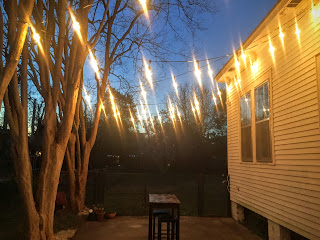
I always love outdoor lights, and have been thinking long and hard about how to incorporate them into the outdoor space at our house. I'd like to spend the great spring, summer, and fall evenings al fresco with some friends, but we didn't know exactly how or where. Then it dawned on me-- we have the perfect driveway for this project!

Since everyone's space varies, I'll just show you a handful of tools and tricks to help you get the desired effect with little cost and big payoff-- all in an afternoon and for under $150!

  • Use as much of your natural environment as you can! You can add anchor points to fences, trees, your house, etc. , just make sure all surfaces are protected from weather. If they move in wind, make sure you have enough slack in your line and on your anchor points.
  • Get commercial-grade outdoor lights like these suspended base ones from 1000Bulbs based in Texas. They are industrial, built for outdoors, and the suspended base helps take load away from the wire string itself. The 1000Bulbs website also has great options for the bulbs themselves, of course. 
  • If affixing anchor points to trees, use plastic-coated wire and soft tubing to not damage your plants. We bought a garden soaker hose to cut into lengths, and it was really cheap. 

  • Create your own wire loops with cable ferrules that can be crimped around the ends. You can use these to attach around trees, fence posts, etc, without damaging the surfaces. They can be unclipped very easily if you need to remove or replace your lights. These loops with tubing in between is what we used to secure the lights to our trees.
  • Quick Links or even S-Clips create clean attachment to your anchor points without stressing either the anchor or your lighted wire. Make sure the links you purchase can fit around your wire or eyelets you may use!
  • If using an outdoor outlet or electrical extension, protect the light outlet from weather by covering thoroughly in waterproof electrical tape or encapsulating the join with an all-weather extension cover made for Christmas lights. It's imperative to keep all electrical terminals away from the elements, even when unplugged to resist corrosion.
  • Lastly, be sure to measure, measure, measure again before cutting, installing any anchor points, or even buying the light string. Use trigonometry to calculate how much lighted footage you'll need, inclusive of the swagging in between points! 


Tudor Rose Cocktail

I've been mildly obsessed with floral things and spring in general. I've also been pondering the idea of our own little hen-house in the yard, but before I'm granted clearance, I have to find viable uses for the number of eggs we'd have on hand! Introducing the Tudor Rose cocktail.


Tudor Rose Cocktail

1.5oz Rose-infused vodka (recipe follows)
1/2oz Campari
1/2oz St. Germain Liqueur
1/2oz good Grenadine
1 fresh egg white

Add ice and water to a coupe glass to chill. In a Boston shaker can, combine all ingredients except egg white. Add ice, and stir vigorously to cool. Strain into shaker pint, and discard ice. In the cool shaker can, add egg white, and agitate with barspoon to break down major proteins and begin the whipping process. DO NOT ADD ICE, we are conducting a reverse dry-shake! Add remaining drink ingredients, seal, and shake vigorously until drink is frothy. Pour into chilled cocktail coupe and serve immediately. 

The roses are from my neighbors' house.

Rose-Infused Vodka

1/4cup fresh fragrant rose petals
1 cup decent vodka

In a mason jar, bruise petals with muddler to express oils, add vodka, and stir. Seal, and let to steep in a cool dark place for 2 days, agitating occasionally. Strain petals before after 2 days, as they will begin to become tannic.